2441V (Rev 2.0+) Manual

From Smarthome

Jump to: navigation, search

Thermostat Adapter - INSTEON® and Totaline / Venstar Compatible - Rev 2.0+
(Model: 2441V)


TABLE OF CONTENTS Hide All

ABOUT THERMOSTAT ADAPTER

What is INSTEON?
Thermostat Adapter Revisions
Key Thermostat Adapter Features
What Is Included with Thermostat Adapter

HOW TO INSTALL THERMOSTAT ADAPTER

Installing/Uninstalling Thermostat Adapter
Important Note About INSTEON Network; 2-Phase vs. 3-Phase Installation
Thermostat Adapter Setup Summary

HOW TO SET UP THERMOSTAT ADAPTER TO BE REMOTELY CONTROLLED BY AN INSTEON CONTROLLER

Linking an INSTEON Controller to Thermostat Adapter
Unlinking Thermostat Adapter from an INSTEON Controller
Remotely Controlling your Thermostat

HOW TO SET UP THERMOSTAT ADAPTER TO CONTROL OR REPORT CHANGES TO REMOTE INSTEON DEVICES

Linking Thermostat Adapter to Control INSTEON Devices
Unlinking a Controlled INSTEON Device from Thermostat Adapter
Reporting Changes to Compatible Automation Controller / Software

ADVANCED FEATURES OF THERMOSTAT ADAPTER

Non-Volatile Memory
Restoring Power to Thermostat Adapter
Resetting Thermostat Adapter to Its Factory Default Settings

ABOUT INSTEON

Understanding Why an INSTEON Network Is Reliable
Further Enhancing Reliability
Using Dual-Band INSTEON Products to Upgrade Your INSTEON Network
Abotu INSTEON and X10

TROUBLESHOOTING

Thermostat Adapter Troubleshooting

SPECIFICATIONS

Thermostat Adapter Specifications
Certification
FCC Compliance Statement
Limited Warranty


What is INSTEON?

Since its inception in 2005, INSTEON® has become the best-selling wireless home-control networking technology, offering more reliability and flexibility than any other home management system on the market. Developed by SmartLabs®, INSTEON technology relies on its dual-mesh network to send signals both through the air (RF, or radio frequency) and over the existing electrical wires (power line) in the home.

Reliable
With every INSTEON device being a repeater (see how this works), the signal gets stronger with every INSTEON device you add to your home, giving you unsurpassed reliability. In addition, each INSTEON message contains error detection, so lights turning on accidentally will virtually never happen.

Fast
Other home automation networks have a noticeable delay when turning on a light or activating an appliance. INSTEON messages get through in less than 0.05 seconds - faster than the human eye can detect, so there are not visible delays. Activate an INSTEON switch and the lights turn on instantly.

X10 Ready
If you've already started putting together an X10 home control network, INSTEON's backward compatibility with X10 devices provides a painless upgrade path to an INSTEON network for the ultimate home automation system. Get the reliability and speed you need without scrapping your existing X10 network.

Affordable
While other home automation systems extend into the thousands of dollars to install and implement, a complete INSTEON system costs a fraction of its competitors. INSTEON can be integrated into any number of products easily and at a very low cost, so it will impact your life a whole lot more than it will impact your wallet.

Common Applications:

  • Scene and remote control lighting
  • Security alarm interfaces and sensors
  • Home sensors (e.g., water, humidity, temperature)
  • Access control (e.g., door locks)
  • Heating and cooling (HVAC) control and management
  • Audio-video control
  • Appliance management
  • Energy savings

How INSTEON Works

What makes INSTEON the most reliable home automation network is its dual-mesh network. INSTEON devices use both radio frequency signals and the home's existing wiring to talk to each other. Every message is confirmed as it is received, and if any errors are detected, the message is automatically resent.

Unlike all other mesh networks, INSTEON's mesh netowrk has every INSTEON device acting as a repeater -- receiving and sending every message to all other devices in the network. So instead of stressing the network by adding more INSTEON devices, you actually strengthen it (see how this works). Other mesh networks use router tables, and only those products involved in routing the signal act as repeaters - resulting in a less reliable network.

No central controller or networking setup is required. Once your module is installed, just use a series of button presses or taps to Link your devices together. INSTEON devices can act as a Controller, Responder or both!

Most importantly, INSTEON networks are extremely secure. Each INSTEON device is assigned a unique INSTEON ID, so unless neighbors or would-be hackers have access to your particular device's INSTEON ID, they won't be able to control your home, even if they are using similar products.

Technology Comparison

  • INSTEON: Moderately priced, highly reliable dual-mesh RF & power line technology
  • UPB: Expensive single-band technology
  • X10: Inexpensive but lacks the robustness, flexibility and reliability required by home-control applications
  • ZigBee & Z-Wave: Single-band (RF-only) wireless networks that require a network controller

Back to Top

Thermostat Adapter Revisions

Click on features for further descriptions and setup instructions.
SmartLabs INSTEON Thermostat Adapter Revision History
Revs 1.0 - 1.9 Revs 2.0+
INSTEON control of thermostat Available Available
Control remote INSTEON devices when A/C, heat, and/or fan switches on / off Not Available Available
Report changes in mode, temperature, and humidity to automation controller / software Not Available Available
Fine-tune thermostat set points by a single degree at a time Not Available Available
Off button functionality to Link to OFF commands, as well as ON commands Not Available Available


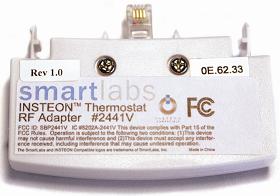
Which Revision Do I Have?

As products are continually being improved, features will vary from one revision to another. Below are instructions for locating the revision of your Thermostat Adapter:
  1. Open the thermostat cover and remove Thermostat Adapter (Don't worry - your Links and settings will be saved)

  2. Locate the sticker (on the back of the unit) which contains "Rev" followed by a number, such as "1.0"
    • The revision of the Thermostat Adapter below is revision 1.0
    Image:2441v.jpgImage:2441vrev.jpg

    Back to Top

    Key Thermostat Adapter Features

    Congratulations on purchasing the INSTEON Thermostat Adapter.

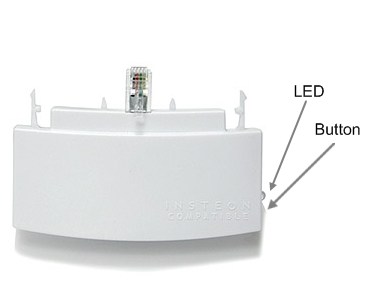
    Image:2411V labeled.jpg

    Key Thermostat Adapter Features

    • Saves energy and money on bills by remotely controlling your thermostat
    • Compatible with Totaline/Venstar T1700, T1800, and T1900 thermostats
    • Powered through your thermostat - no batteries needed
    • Automatically controls remote INSTEON devices when the thermostat switches A/C, heat, and fan on or off
    • Reports changes in thermostat modes, temperature and humidity to compatible automation controllers or software
    • Fine-tunes thermostat set points by single degrees from any INSTEON Controller with specific Bright/Dim buttons
    • Warranted for 2 years

    Back to Top

    What Is Included with Thermostat Adapter

    Image:2441V.jpg


    • INSTEON Thermostat Adapter
    • Quick-Start Guide

    Back to Top

    Installing/Uninstalling Thermostat Adapter

    IMPORTANT!

    If you are not knowledgeable about and comfortable with electrical circuitry or HVAC installation, you should have a qualified electrician install a compatible thermostat for you. To verify you have a compatible thermostat please contact:

    Smarthome Tech Support
    1-800-SMARTHOME
    (800-762-7846)


    Before installing Thermostat Adapter, please familiarize yourself with the following and take the necessary precautions listed here:

    • Be sure that you have a compatible Totaline or Venstar thermostat properly installed
    • INSTEON network performance requires you to have properly installed at least two Access Points or other dual-band products


    Installing INSTEON Thermostat Adapter

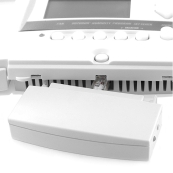
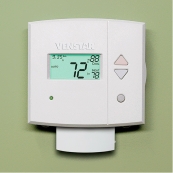
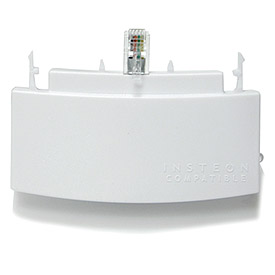
    1. Plug Thermostat Adapter into the jack on the bottom of your thermostat
      The Thermostat Adapter LED will turn on solid green


      Image:2441V.jpg Image:2441V insert.jpg Image:2441V install.jpg


    Uninstalling Thermostat Adapter

    1. Open the front cover of your thermostat by gently pulling the right edge of the cover towards you

    2. While pressing firmly on the small round button (located on the bottom, center of the thermostat), pull down gently on Thermostat Adapter
      The Thermostat Adapter LED will turn off

    Back to Top

    Important Note About INSTEON Network; 2-Phase vs. 3-Phase Installation

    For the best INSTEON network performance, be sure you have properly installed at least two Access Points or other dual-band products. INSTEON has only officially been tested in a 2-(split single-) phase residential environment, but has been known to work in many 3-phase systems, where three dual-band products are used (on each phase). However, due to the potential complexity of its troubleshooting, Smarthome Tech Support is unable to support INSTEON in 3-phase environments.

    Back to Top

    Thermostat Adapter Set Up Summary

    Below is a "cheat sheet" for keeping track of all the new features introduced in Thermostat Adapter Revision 2.0. Click on the feature for detailed descriptions and intstructions.
    INSTEON Thermostat Adapter Setup Chart
    Step 1 Step 2 Step 3 Step 4
    Action Controller: Controls: Set Thermostat Mode: Press and Hold (10 seconds): Press and Hold (10 seconds): Press and Hold (10 seconds):
    Link INSTEON Controller Thermostat To desired mode / set point On / Set button (INSTEON Controller) Thermostat Adapter Set button
    Unlink INSTEON Controller Thermostat On / Set button (INSTEON Controller) On / Set button (INSTEON Controller) Thermostat Adapter Set button
    Link Thermostat A/C On/Off INSTEON device To cool mode Thermostat Adapter Set button Set button (INSTEON device)
    Link Thermostat Heat On/Off INSTEON device To heat mode Thermostat Adapter Set button Set button (INSTEON device)
    Link Thermostat Fan On/Off INSTEON device To "FanOn" mode Thermostat Adapter Set button Set button (INSTEON device)
    Unlink Thermostat A/C On/Off INSTEON device To cool mode Thermostat Adapter Set button Thermostat Adapter Set button Set button (INSTEON device)
    Unlink Thermostat Heat On/Off INSTEON device To heat mode Thermostat Adapter Set button Thermostat Adapter Set button Set button (INSTEON device)
    Unlink Thermostat Fan On/Off INSTEON device To "FanOn" mode Thermostat Adapter Set button Thermostat Adapter Set button Set button (INSTEON device)
    Enable Report mode, temperature, humidity changes Automation controller / software To off mode Thermostat Adapter Set button Set button (controller / interface)
    Disable Report mode, temperature, humidity Changes Automation controller / software To off mode Thermostat Adapter Set button Thermostat Adapter Set button Set button (controller / interface)

    Back to Top

    Linking an INSTEON Controller to Thermostat Adapter

    Thermostat Adapter includes a special feature that allows you to Link individual commands to the On and Off buttons on your Controller. For example, you can Link the heat to turn on when you press the On button and Link the fan to turn on when you press the Off button on your Controller.

    NOTE: Each of the buttons must be Linked separately. If you only Link to the On button, nothing will happen when you press the Off button, unless you specifically program an action to it.

    To use Thermostat Adapter as a Responder to an INSTEON Controller, follow these steps to Link Thermostat Adapter and the Controller together. See your Controller's Owner's Manual for more detailed instructions.

    The following will work for the most common INSTEON Controllers:

    1. Set your Controller to Linking Mode. (For most Controllers, you just press & hold an On or Scene button for 10 seconds or the Set button for 3 seconds.)

      You will have 4 minutes to complete the next steps before Linking Mode automatically times out.
      BE CAREFUL: Any unnecessary button presses will exit Linking Mode prematurely.

    1. To Link to an On button:
      • Set your thermostat to the desired mode (Manual/Program/Auto, Heat/Cool, Temperature, Fan Auto/Fan On)
    Image:2441v temp set.jpg
      • Tap the Set button on Thermostat Adapter once

      • Press & hold the Set button on Thermostat Adapter for about 3 seconds
        The thermostat display will flash all the LCD characters twice
    Image:2441v_button_press.jpg
    1. To Link to an Off button:
      • Set your thermostat to the desired mode (Manual/Program/Auto, Heat/Cool, Temperature, Fan Auto/Fan On)
    Image:2441v temp set.jpg
      • Tap the Set button on Thermostat Adapter twice

      • Press & hold the Set button on Thermostat Adapter for about 3 seconds
        The thermostat display will flash all the LCD characters twice
    Image:2441v_button_press.jpg
    1. Test that Linking was successful by changing the mode on your thermostat, then tapping the buttons you just Linked on the Controller

      NOTE: Different set points can be Linked to different button should you need more flexibility.

    2. If your Controller is a multi-scene device, you can repeat steps 1 through 4 for as many scenes and set points on your Controller as you wish.


                        Back to Top

                        Unlinking Thermostat Adapter from an INSTEON Controller

                        If you are no longer going to control a Thermostat Adapter that has been previously Linked to an INSTEON Controller, it is very important that you Unlink it, because otherwise the Controller will retry any command intended for the unused Thermostat Adapter, thus slowing down your system.


                        NOTE: If you Unlink Thermostat Adapter from a single button of an On/Off button pair, any Linked commands for the Controller will be erased, even if the commands were Linked to separate buttons. You will have to re-Link the commands you wish to continue using on your Controller.

                        The following will work for the most common INSTEON Controllers:

                        1. Set your Controller to Unlinking Mode. (For most Controllers, you just press & hold an Off button for 10 seconds twice or a Set button for 3 seconds twice.)
                          You will have 4 minutes to complete steps 2 and 3 before Unlinking Mode automatically times out.
                        1. Tap the Thermostat Adapter Set button

                        2. Press & hold the Set button on Thermostat Adapter for about 3 seconds
                          The thermostat display will flash all the LCD characters twice
                        Image:2441v_button_press.jpg
                        1. If there are any commands you would like to continue using with the Controller, re-Link them with the prior settings


                              Back to Top

                              Remotely Controlling your Thermostat

                              Recalling Mode / Set Point(s)

                              Once you have Linked an INSTEON Controller to Thermostat Adapter, you can recall the mode and set point settings set during Linking by pressing the On button on your INSTEON Controller.

                              Temperature Set Point Adjustments

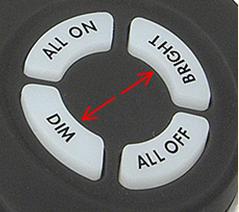
                              Some devices, such as RemoteLinc, have specific dim/bright buttons which can be used to adjust the current thermostat set point up or down by a single degree. For example, the RemoteLinc Dim/Bright buttons are shown to the right.

                              To adjust your thermostat's set point by a single degree:

                              1. Recall a mode/set point by pressing an On button from the desired Linked Controller
                              1. Tap the Bright button (to increase) or Dim button (to decrease) and adjust the temperature. Each button tap will adjust the temperature by a single degree.

                                NOTE: While pressing & holding On or Off buttons does dim and brighten other INSTEON devices, Thermostat Adapter will ignore those types of dim/bright commands to prevent "runaway" temperature set points.

                              RemoteLinc Dim / Bright buttons
                              RemoteLinc Dim / Bright buttons


                                  Back to Top

                                  Linking Thermostat Adapter to Control INSTEON Devices

                                  Thermostat Adapter can turn remote INSTEON devices on and off when the thermostat switches the A/C, heat, and/or fan on and off. This feature is useful for synchronizing your thermostat with other INSTEON-compatible thermostats or equipment such as booster fans, dampers, etc. To Link Thermostat Adapter to control other INSTEON devices, follow the instructions for the desired system below.

                                  A/C

                                  Turn INSTEON Responders on when the thermostat turns on the A/C, and off when the A/C is turned off:

                                  1. Tap the thermostat mode button until it is in Cool mode (only a cool set point will be displayed)

                                  2. Press & hold the Set button on Thermostat Adapter for 3 seconds
                                    The green Thermostat Adapter LED will begin blinking
                                    The thermostat display will flash all the LCD characters
                                  3. Press & hold the Set button of the desired Responder for 3 seconds
                                    The green Thermostat Adapter LED will stop blinking
                                    The thermostat display will flash all the LCD characters
                                  4. Test by tapping the thermostat's down arrow until the A/C and the thermostat's LED turns on green. Then, tap the up arrow until the A/C and the LED turns off.
                                    The Responder will turn on, then off
                                    HouseLinc 2 Tip: INSTEON devices controlled by the A/C correspond to the Thermostat Adapter Controller Scene 1.

                                  Heat

                                  Turn Responders on when the thermostat turns on the heater and off when the heater is turned off:

                                  1. Tap the thermostat mode button until it is in Heat mode (only a heat set point will be displayed)

                                  2. Press & hold the Set button on Thermostat Adapter for 3 seconds
                                    The green Thermostat Adapter LED will begin blinking
                                    The thermostat display will flash all the LCD characters
                                  3. Press & hold the Set button of the desired Responder for 3 seconds
                                    The thermostat display will flash all the LCD characters

                                  4. Test by tapping the thermostat's up arrow until the heat and the thermostat's red LED turns on. Then, tap the down arrow until the heat and the LED turns off.
                                    The Responder will turn on, then off
                                    HouseLinc 2 Tip: INSTEON devices controlled by the heat correspond to the Thermostat Adapter Controller Scene 2.

                                  Fan

                                  Turn Responders on when the fan is turned on manually or via thermostat timer and off when the fan is turned off:
                                  NOTE: Although the fan is used during heat and A/C modes, the INSTEON devices will only turn on and off when the fan is controlled manually or by a Controller, or via thermostat timer.

                                  1. Open the thermostat cover and tap the Fan button until "FanOn" is displayed on the thermostat display. Then, set your thermostat to Off mode.

                                  2. Press & hold the Set button on Thermostat Adapter for 3 seconds
                                    The green Thermostat Adapter LED will begin blinking
                                    The thermostat display will flash all of the LCD characters
                                  3. Press & hold the Set button of the desired Responder for 3 seconds
                                    The green Thermostat Adapter LED will begin blinking
                                    The thermostat display will flash all the LCD characters
                                  4. Test by tapping the Fan button a few times
                                    The Responder will turn on or off each time the Fan button is pressed
                                    HouseLinc 2 Tip: INSTEON devices controlled by the fan correspond to the Thermostat Adapter Controller Scene 3.


                                  Back to Top

                                  Unlinking a Controlled INSTEON Device from Thermostat Adapter

                                  Thermostat Adapter can turn Responders on and off when the thermostat switches the A/C, heat, and/or fan on or off. This feature is useful for synchronizing your thermostat with other INSTEON-compatible thermostats or equipment such as booster fans, dampers, etc. To Unlink a Responder from Thermostat Adapter, find the instructions for the desired system below.

                                  A/C

                                  1. Press the thermostat mode button until it is in cool mode (only a cool set point will be displayed)

                                  2. Press & hold the Set button on Thermostat Adapter for 3 seconds
                                    The green Thermostat Adapter LED will begin blinking

                                  3. Press & hold the Set button on Thermostat Adapter for another 3 seconds
                                    The Thermostat Adapter LED will continue blinking

                                  4. Press & hold the Set button on the Responder for 3 seconds
                                    The green Thermostat Adapter will stop blinking

                                  5. Test by pressing the thermostat's down arrow until the A/C and the thermostat's LED turns on. Then, tap the up arrow until the A/C and the thermostat's LED turns off.
                                    The Responder will no longer turn on and off in response
                                    HouseLinc 2 Tip: INSTEON devices controlled by the A/C correspond to Thermostat Adapter's Controller Scene 1.

                                  Heat

                                  1. Press the thermostat mode button until it is in heat mode (only a heat set point will be displayed)

                                  2. Press & hold the Set button on Thermostat Adapter for 5 seconds
                                    The green Thermostat Adapter LED will begin blinking

                                  3. Press & hold the Set button on Thermostat Adapter for another 5 seconds
                                    The green Thermostat Adapter LED will continue blinking

                                  4. Press & hold the Set button of the desired Responder for 3 seconds
                                    The green Thermostat Adapter LED will stop blinking

                                  5. Test by tapping the thermostat's up arrow until the heat and the thermostat's red LED turns on. Then, tap the down arrow until the heat and the thermostat's red LED turns off
                                    The Responder will no longer turn on and off in response
                                    HouseLinc 2 Tip: INSTEON devices controlled by the heat correspond to Thermostat Adapter's Controller Scene 2.

                                  Fan

                                  1. Open the thermostat's cover and press the Fan button until "FanOn" is displayed on the thermostat display

                                  2. Press & hold the Set button on Thermostat Adapter for 3 seconds
                                    The green Thermostat Adapter LED will begin blinking

                                  3. Press & hold the Set button on Thermostat Adapter for another 3 seconds
                                    The green Thermostat Adapter LED will continue blinking

                                  4. Press & hold the Set button on the desired Responder for about 3 seconds
                                    The green Thermostat Adapter LED will stop blinking

                                  5. Test by pressing the Fan button a few times
                                    The Responder will no longer turn on or off each time the Fan button in pressed
                                    HouseLinc 2 Tip: INSTEON devices controlled by the fan correspond to Thermostat Adapter's Controller Scene 3.


                                  Back to Top

                                  Reporting Changes to Compatible Automation Controller / Software

                                  Thermostat Adapter will report the following changes to a compatible-INSTEON home automation controller or software once a change has "stabilized" for 2 minutes:
                                  • Temperature
                                  • Humidity
                                  • Thermostat Mode
                                  • Fan Mode
                                  • Set Points

                                  NOTE: Thermostat Adapter will only report changes to the last device it was Linked to, using the instructions below. For example, to change the controller or interface to which you'd like changes to be reported, simply follow the 'enable' instructions, with the new controller or interface as the Responder.
                                  Compatibility: While Thermostat Adapter will report to any automation controller or interface you Link to via the following instructions, check with the manufacturer or documentation of your automation controller / software about compatibility with this feature.

                                  To enable change reports

                                  1. Press the thermostat mode button until the thermostat mode (and LED) turns off

                                  2. Press & hold the Set button on Thermostat Adapter for 3 seconds
                                    The green Thermostat Adapter LED will begin blinking

                                  3. Press & hold the Set button on the desired Responder for 3 seconds
                                    The Thermostat Adapter LED will stop blinking

                                  To disable change reports

                                  1. Press the thermostat mode button until the thermostat mode (and LED) turns off

                                  2. Press & hold the Set button on Thermostat Adapter for 3 seconds
                                    The green Thermostat Adapter LED will begin blinking

                                  3. Press & hold the Set button on Thermostat Adapter for another 3 seconds
                                    The green Thermostat Adapter LED will continue blinking

                                  4. Press & hold the Set button on the desired automation controller (or interface) for 3 seconds
                                    The Thermostat Adapter LED will stop blinking

                                  Back to Top

                                  Non-Volatile Memory

                                  Non-volatile memory is a memory chip that can retain settings or data without any power whatsoever. An example of non-volatile memory is flash memory.

                                  INSTEON devices saves all settings, such as Links to other INSTEON devices or X10 Address settings, with non-volatile memory. Because settings are saved in this non-volatile memory, they will not be lost in the event of a power failure.

                                  Additionally, in the event of a power loss, the INSTEON device will return the controlled item to its last-known powered state once power is restored.

                                  Back to Top

                                  Restoring Power to Thermostat Adapter

                                  This INSTEON device stores all of its settings in non-volatile memory, so the settings are not lost even when power is removed. In the event of a power loss, this device will automatically return the local load to the level it had before the power was interrupted.

                                  Back to Top

                                  Resetting Thermostat Adapter to Its Factory Default Settings

                                  The factory reset procedure can be used to clear the Thermostat Adapter memory and restore its factory default settings. This procedure will clear the unit of all INSTEON Links.
                                  1. Before resetting a Thermostat Adapter that has been Linked to an INSTEON Controller, be sure to Unlink it from the Controller first. See Unlinking Thermostat Adapter from an INSTEON Controller.

                                  2. Unplug Thermostat Adapter from your thermostat
                                    • Open the front “cover” of the thermostat by gently pulling the right edge of the cover towards you
                                    • While pressing firmly on the small round button (bottom center of thermostat), gently pull down on Thermostat Adapter
                                    • Thermostat Adapter will disconnect from the thermostat

                                  3. Wait 10 seconds

                                  4. Press & hold the button on Thermostat Adapter

                                  5. While pressing & holding the Set button on Thermostat Adapter, plug the unit back into your thermostat, making sure not to let go of the Set button

                                  6. Once Thermostat Adapter is plugged back in, continue to hold the Set button for about 3 seconds
                                  7. The Thermostat Adapter LED will stay off for about 20 seconds and then turn on
                                    The LCD display on your thermostat will flash all its display characters three times, then return to normal
                                    The Thermostat Adapter LED will flicker for a few moments and then turn on solid

                                  Back to Top

                                  Understanding Why an INSTEON Network Is Reliable

                                  INSTEON messages travel throughout the home via power line on the existing house wiring, or wirelessly via RF using Access Points or other dual-band products. As the messages make their way to the INSTEON devices being controlled, they are picked up and retransmitted by all other INSTEON devices along the way. This method of communicating, called a mesh network, is very reliable because each additional INSTEON device helps to support the overall network.

                                  To further ensure reliability, every INSTEON device confirms that it has received a command. If an INSTEON Controller does not receive this confirmation, it will automatically retransmit the command up to five times.

                                  Back to Top

                                  Further Enhancing Reliability

                                  As signals travel via the power line or RF throughout the home, they naturally become weaker the farther they travel. The best way to overcome signals getting weaker is to increase the coverage of the mesh network by introducing more INSTEON devices.

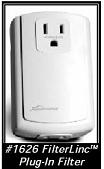
                                  It is possible that some audio-video products, computers, power strips or other electrical equipment may attenuate INSTEON signals on the power line. You can temporarily unplug suspected devices to test whether the INSTEON signal improves. If it does, then you can plug in filters available from SmartLabs that will permanently fix the problem.

                                  Image:1626.JPG

                                  Back to Top

                                  Using Dual-Band INSTEON Products to Upgrade Your INSTEON Network

                                  Dual-band INSTEON products, such as Access Points, are ideal for improving signal strength and network coverage throughout your home. Dual-band products simultaneously transmit INSTEON signals to both power phases in your home (RF and power line). Without a reliable method for coupling opposite power phases some parts of your home may receive signals intermittently. With at least one dual-band product plugged into one of the power phases, and at least one more plugged into the opposite power phase, INSTEON signals will be strong everywhere in your home.

                                  Dual-band products also translate RF signals into power line signals, allowing communication between RF-only and power line-only INSTEON devices. While only one properly installed dual-band product is needed to translate signals between the two phases, it is recommended to have at least two dual-band products for the best INSTEON network performance.

                                  Back to Top

                                  About INSTEON and X10

                                  Possible BoosterLinc Interference with INSTEON

                                  If you have installed older SmartLabs Plug-In BoosterLinc X10 Signal Boosters or certain other BoosterLinc-enabled products, the older BoosterLinc technology may interfere with INSTEON communications. Plug-In BoosterLinc X10 Signal Boosters, SmartLabs (#4827) shipped after February 1, 2005, with V3.0 or later firmware, are fully compatible with INSTEON.

                                  The following Plug-In BoosterLinc X10 Signal Boosters use older firmware that may cause interference with INSTEON:

                                  • White BoosterLinc X10 Signal Boosters (#4827) shipped before February 1, 2005, with V2.5 or earlier firmware
                                  • All Gray BoosterLinc X10 Signal Boosters (#4827)

                                  Try unplugging the older BoosterLinc X10 Signal Boosters to see if this helps with INSTEON interference, If it does, please call Smarthome Tech Support at 800-762-7846 for help with replacing your older BoosterLinc X10 Signal Boosters with newer INSTEON-compatible ones.

                                  The following pre-INSTEON SmartLabs products have BoosterLinc technology that you can turn on or turn off when you set the X10 Address for the product. If turned on, the BoosterLinc technology may interfere with INSTEON.

                                  Image:Kpl.JPG KeypadLinc 6-Button with Integrated Dimmer (#12073W, #12073WB and #12073WW)
                                  Image:SWL.JPG SwitchLinc Relay 2-Way (#23883 and #23883T)
                                  Image:TLD.JPG ToggleLinc 2-Way Dimmer (#23890) and Switch (#23893)
                                  Note

                                  To disable BoosterLinc X10 Signal Amplification on these products:

                                  1. Press & hold the Set button
                                  2. Send the X10 Primary Address
                                  3. Send an X10 OFF command

                                  You can send an X10 ON command in Step 3 to re-enable the BoosterLinc feature.


                                  If you have any of these products and the BoosterLinc feature is turned on, please consult your Owner's Manual or call Smarthome Tech support at 800-762-7846 for help with turning it off.
                                  You may then wish to install newer INSTEON BoosterLinc X10 Signal Boosters, which Smarthome Tech Support can help you with.

                                  How INSTEON Effects X10

                                  If your existing X10 devices seem to be working less reliably after installing INSTEON devices, remember that INSTEON devices can absorb X10 signals just as X10 devices do, and that INSTEON devices do not repeat X10 signals. Installing INSTEON-compatible BoosterLinc X10 Signal Boosters (#4827), or a SignaLinc Plug-In Coupler-Repeater (#4826), can increase X10 signal levels.
                                  Please call Smarthome Tech Support at 800-762-7846 if you have any questions or would like more help.

                                  Back to Top

                                  Thermostat Adapter Troubleshooting

                                  Problem
                                  Possible Cause
                                  Solution
                                  The LED on Thermostat Adapter is not turning on at all. Thermostat Adapter is not getting power. Make sure your thermostat is working properly.
                                  Make sure that Thermostat Adapter is properly installed.
                                  My INSTEON Controller is not controlling the thermostat. Thermostat Adapter is not receiving the RF command. Verify that the green LED on Thermostat Adapter is on.
                                  Make sure that an Access Point or other dual-band product is plugged into a nearby receptacle.
                                  My Thermostat Adapter is not Linking to or working with an INSTEON Controller or device. The INSTEON signal may be too weak Make sure two Access Points or other dual-band products are properly installed to bridge the two power line phases.
                                  Add new INSTEON devices or move around existing INSTEON devices. All INSTEON devices act as INSTEON network repeaters.
                                  Make sure you are not experiencing interference with older X10 BoosterLinc technology. Upgrade to INSTEON-compatible BoosterLinc modules.
                                  Thermostat Adapter doesn't always respond to an INSTEON Controller. The INSTEON Controller may have been reset without first Unlinking Thermostat Adapter from it. Re-Link Thermostat Adapter to the INSTEON Controller.
                                  Thermostat Adapter does not respond to my OFF commands from my INSTEON Controller. This is a normal operation. For Rev 1.0-1.9, this is a built-in feature; any version less than 2.0 will not respond to an OFF command. Only Rev 2.0 and above have Off button functionality. See Which Revision Do I Have? for help determining what revision you have.


                                  If you have tried these solutions, reviewed this Owner's Manual, and still cannot resolve an issue you are having with Thermostat Adapter, please:

                                  Back to Top

                                  Thermostat Adapter Specifications

                                  See Thermostat Adapter - INSTEON and Totaline / Venstar Compatible Specifications on Smarthome.com

                                  Back to Top

                                  Certification

                                  This product has been thoroughly tested by ITS ETL SEMKO, a nationally recognized independent third-party testing laboratory. The North American ETL Listed mark signifies that the product has been tested to and has met the requirements of a widely recognized consensus of U.S and Canadian product safety standards, that the manufacturing site has been audited, and that the manufacturer has agreed to a program of quarterly factory follow-up inspections to verify continued conformance.
                                  Image:ETL.JPG

                                  Back to Top

                                  FCC Compliance Statement

                                  This device complies with FCC Rules Part 15. Operation is subject to two conditions: (1) this device may not cause harmful interference, and (2) this device must accept any interference that may be received or that may cause undesired operation. The digital circuitry of this device has been tested and found to comply with the limits for a Class B digital device, pursuant to Part 15 of the FCC Rules. These limits are designed to provide reasonable protection against harmful interference in residential installations. This equipment generates, uses, and can radiate radio frequency energy and, if not installed and used in accordance with the instructions, may cause harmful interference to radio and television reception. However, there is no guarantee that interference will not occur in a particular installation. If this device does cause such interference, which can be verified by turning the device off and on, the user is encouraged to eliminate the interference by one or more of the following measures:
                                  • Re-orient or re-locate the receiving antenna of the device experiencing the interference
                                  • Increase the distance between this device and the receiver
                                  • Connect the device to an AC outlet on a circuit different from the one that supplies power to the receiver
                                  • Consult the dealer or an experienced radio/TV technician


                                  WARNING: Changes or modifications to this unit not expressly approved by the party responsible for compliance could void the user's authority to operate the equipment.

                                  Back to Top

                                  Limited Warranty


                                  Seller warrants to the original consumer purchaser of this product that, for a period of two years from the date of purchase, this product will be free from defects in material and workmanship and will perform in substantial conformity to the description of the product in this Owner's Manual. This warranty shall not apply to defects or errors caused by misuse or neglect. If the product is found to be defective in material or workmanship, or if the product does not perform as warranted above during the warranty period, Seller will either repair it, replace it or refund the purchase price, at its option, upon receipt of the product at the address below, postage prepaid, with proof of the date of purchase and an explanation of the defect or error. The repair, replacement, or refund that is provided for above shall be the full extent of Seller’s liability with respect to this product. For repair or replacement during the warranty period, call SmartLabs customer service to receive a RA # (return authorization number), properly package the product (with the RA# clearly printed on the outside of the package) and send the product, along with all other required materials, to:

                                  SmartLabs, Inc

                                  ATTN: Receiving Dept.
                                  16542 Millikan Ave.
                                  Irvine, CA 92606-5027

                                  Limitations

                                  The above warranty is in lieu of and seller disclaims all other warranties, whether oral or written, express or implied, including and warranty or merchantability or fitness for a particular purpose. Any implied warranty, including any warranty of merchantability or fitness for a particular purpose, which may not be disclaimed or supplanted as provided above shall be limited to the one-year period of the express warranty above. No other representation or claim of any nature by any person shall be binding upon seller or modify the terms of the above warranty and disclaimer. In no event shall seller be liable for special, incidental, consequential, or other damages resulting from the possession or use of this product, including without limitation damage to property and, to the extent permitted by law, personal injury, even if seller knew or should have known of the possibility of such damages. Some states do not allow limitations on how long an implied warranty lasts and / or the exclusion or limitation of damages, in which case the above limitations and / or exclusions may not apply to you. You may also have other legal rights that may vary from state to state.

                                  INSTEON Technology Patent

                                  U.S. Patent No. 7,345,998, International patents pending

                                  Trademark

                                  INSTEON, ICON, Plug-n-Tap, ApplianceLinc, BoosterLinc, ControLinc, FilterLinc, HouseLinc, In-LineLinc, I/O Linc, IRLinc, KeypadLinc, LampLinc, OutletLinc, PowerLinc, ProbeLinc, RemoteLinc, SignaLinc, SmartLinc, SocketLinc, SwitchLinc, TempLinc, TesterLinc, TimerLinc, ToggleLinc, TriggerLinc, Smarthome, SmartLabs, and SmarthomeLive are trademarks of SmartLabs, Inc.

                                  © Copyright 2005-2010

                                  Back to Top

                                  Personal tools